
Hammer A3-31 Planer/Thicknesser
| Aliases | Jointer/thickness planer, combination machine |
| Other References | |
| Official Maintainer | Ale Moré |
Current Status
Working
Machine is working as expected.
Usage
This machine requires induction to use.
Induction
This machine's induction, as some others in the woodshop, is organized through a forum post. In the following link, you will find more information about it. Getting around - Inductions
Guidelines
PLACEHOLDER: This is where you can document the usage practices for the machine generally. If this section gets very long, then it should be part of a canvas course for induction. Don't document maintenance procedures here, please do that below in the maintenance section. Delete this line.
Recommended PPE
PLACEHOLDER: There is a large collection of PPE Icons in the “resources” folder. Please update these two columns with appropriate PPE recommendations. Columns of the tables are “Recommended/Required/Warning/Maintenance”, PPE Icon and Description. Delete this line.
| Recommended |  | We recommend hearing protection. |
| Recommended |  | Please wear goggles or a face shield |
| Recommended |  | We recommend the use of a respirator |
| Required |  | Enclosed shoes are required, no open sandals, thongs etc |
| Warning |  | Gloves are PPE against your material (splinters, resin etc) but are hazardous around the saw. Please carefully evaluate your use of gloves |
| Maintenance |  | Disconnect power to the saw before performing maintenance, including blade changes |
Machine Specifications
PLACEHOLDER: Please fill out this table with all relevant machine specifications. The manufacturers website usually gives a good list. Delete this line.
| Name | Value |
|---|---|
| Attribute A | 305mm |
| Attribute B | 1600 mm x 270 mm |
| Attribute C | 3.0 hp |
Documents
PLACEHOLDER: Please copy the two WRAP blocks below for each file you upload relevant to this machine. This should be the manual at a minimum. Delete this line.
Manufacturer
PLACEHOLDER: Document the manufacturer, things like contact person names, emails, phone numbers, product urls etc. Document the reseller we bought from, and any other sources for similar things. Delete this line.
Manufacturer
- E sales@example.com
- P 00 0000 0000
Reseller
- Mr. Re seller
- Reseller Agencies
- E sales@reseller.com
- M 0000 000 000
Known Identical Models
- Links to other machines that are a rebrand or similar
Known Issues
| Date | Description | Workaround | Proposed Remediation |
|---|---|---|---|
| 01/01/2020 | PLACEHOLDER Describe the problem | PLACEHOLDER Describe the workaround currently in place | Placeholder Describe a proposed fix or solution |
Modifications / Repair History
| Date | Modified By | Description | Remediation | Cost |
|---|---|---|---|---|
| 01/01/2020 | PLACEHOLDER NAME | PLACEHOLDER Describe what happened | PLACEHOLDER Describe how it was fixed or modified | PLACEHOLDER document the cost of the change |
Accessories
| Image | Category | Accessory Name & Notes | Location | Buy from |
|---|---|---|---|---|
| PLACEHOLDER Category of accessory | PLACEHOLDER Accessory Name PLACEHOLDER Description and usage notes for accessory | PLACEHOLDER Describe location of accessory | PLACEHOLDER Link to where it was bought from |
Consumables & Running Costs
| Image | Category | Accessory Name & Notes | Location | Buy from |
|---|---|---|---|---|
| General | Carbide inserts (13.8×13.8.x2.5 R150). | On the cutter head plastic box, inside the dewalt cart tool (pantorouter) | They can be bought for a cheaper price than felder in amazon. https://www.amazon.com.au/Hammer-Felder-Silent-Spiral-Cutter/dp/B06XKJP3PT |
Maintenance Log
28/03/2021
I've installed a new set of inserts on the cutter head. To keep tracking next time we will rotate these inserts clockwise. The photo indicates how they were installed this time. Ale More.

27/06/2021
I've rotated the inserts. To keep tracking next time we will rotate these inserts clockwise. The photo indicates how they were installed this time. Ale More.

16/04/2022
I've rotated the inserts. To keep tracking next time we will rotate these inserts clockwise. The photo indicates how they were installed this time. Ale More.

18/12/2022
I’ve replace the inserts with a whole new set. To keep tracking next time we will rotate these inserts clockwise. The photo indicates how they were installed this time. Ale More.

RACI
PLACEHOLDER A RACI is an important documentation process to let people know what ACTIONS can happen, and who needs to be Responsible, Accountable, Consulted and Informed for each ACTION. Delete this line.
| Task / Action | Executive | Cause Leader Cause Team | Named Maintainer | Trainers | Cause | Membership | Implementer |
|---|---|---|---|---|---|---|---|
| Modification and Repairs | - | AC | C | I | I | I | R |
| Induction changes | C | RACI | RC | I | I | I | R |
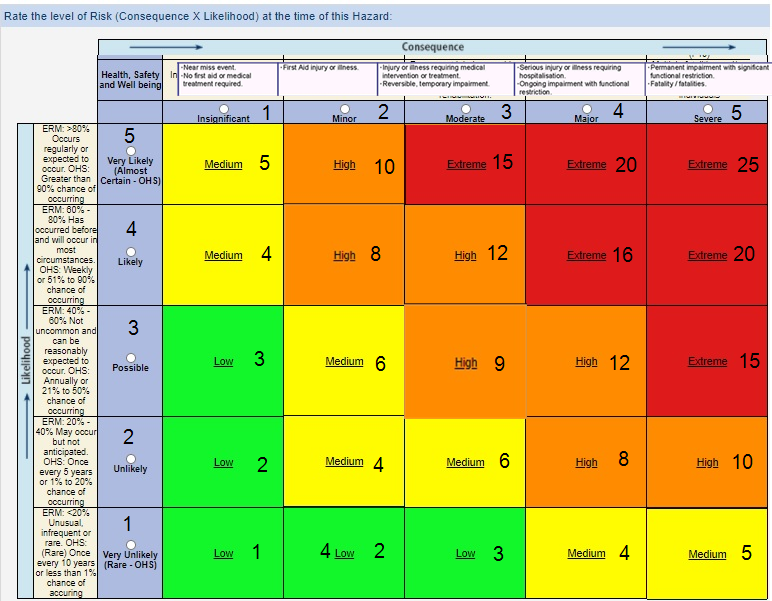
Risk Matrix and Mitigation
PLACEHOLDER: Risk assessment is important to ensure we are making tools available to members in a responsible fashion. Please make every effort to do a reasonable risk assessment. If there is a safety incident with the tool, please redo a risk assessment and add it to the table.
| Ref / ID | Pre-Mitigation | Mitigations / Warnings / Remedies | Post Mitigation | ||||||
|---|---|---|---|---|---|---|---|---|---|
| Risk | Risk Severity | Risk Likelyhood | Risk Level | Risk Severity | Risk Likelyhood | Risk Level | Acceptable to Proceed | ||
| 0001 | PLACEHOLDER DEATH | Intolerable | Probable | 11 | PLACEHOLDER Induction to train users in correct usage | Low | Improbable | 1 | |
Decision Register
PLACEHOLDER: A decision register is for general documentation when some decision is made regarding the tool. To change its location, mode of operation, to buy an accessory, to replace something, to change how it operates etc. Delete this line.
| Ref / ID | Decision Details | Impact | Proposed Date | Proposed By | Status | Approved By | Date | Resulting Actions and Comments |
|---|---|---|---|---|---|---|---|---|
| 0000 | Example decision | Provides an example | 08/08/20 | JH | Approved | JH | 08/08/20 | A line was put in the register |
Thicknesser / Planer
We have a Hammer A3-31, located in the woodshop. You need to be inducted on this machine to operate it.
Thicknesser / Planer adjustments
Outfeed table height
Blade height is set by raising or lowering the outfeed table. The blade position is set. The Blade should be _slightly_ higher than the outfeed to give a straight cut. If the blade is too low joints will be convex, too high and joints will be concave or stepped. We're looking for the goldilocks height. The Blade also needs to be level to the outfeed table. The outfeed table is the REFERENCE FACE - when planing one should aim to have the freshly cut face resting on this table.
Theory of operation
Height and level (left-to-right as one looks at the machine) of both tables is set by a pair of eccentric rods, joined by a linkage so that they turn together. These rods move the hinge and a plate at the front of the table relative to the table surface. As long as the linkage is working, the two will move in sync and the table will move without tilting left-right. To adjust left-right tilt, disconnect the linkage and rotate the bars individually.

 Once the bars are loosened, they can be moved with the help of a lever (a screwdriver in this case). In the first photo we can see the locking bolt on the linkage in place. This has been removed in the second photo.
Adjusting process
The manual only hints at how to do this, but this seems to work..
 1. Disconnect the power!!
2. Did you disconnect the power? Check.
3. Rotate the guard arm out of the way (loosen the cam where the arm meets the machine and rotate).
 4. Remove the covers (front and back) with a 5mm(?) allen key…
.. to reveal the linkage between the ecentric rods and the locking bolt.
 4. Remove the locking bolt (7mm AF).
 5. The manual suggests loosening the 17mm nuts immediately behind the linkage to allow the rods to rotate. There is very little room behind the linkage so I suggest you loosen the nuts at the back of the hinge instead/as well..


6. With a bit of luck, and perhaps some gentle percussive persuasion, you should be able to rotate the eccentric rods in unison.
7. Rotate the left hand bar with a lever (screwdriver in this case). Clockwise raises the table.
8. Close the table and cinch the hand clamp.
 9. Check blade height. Use a flat stick, resting on the outfeed table. The blade should just catch the stick. Check that the catch is the same at each end of the blade, indicating that the table is level to the blade.
 10. If the table is _not_ level to the blade, adjust the bolts at the front of the machine. Mark the top of the bolts and rotate each by the same amount.
11. If the blade is not at the correct height, go back to 7. Rinse and repeat.
12. Once happy with level and height, re-tighten the bolts (front and back) holding the rods.
13. re-install the locking bolt on the linkage. If the slot for the bolt and the threaded hole no longer overlap, loosen the hex-head bolts cinching the linkage to both rods and move the linkage (the rods NOT moving) putting the threaded hole in the middle of the slot. I had to do this the first time, but hopefully it's now in a good place.
14. If the table has been moved, you may find that the hand clamp no longer cinches - move the plate into which this locks up or down by loosening the bolt holding it to the frame.
15. Remove all tools from the machine, replace the guard. Plug the power back in.
16. Run a wide plank through at 1mm or so. Give it a couple of passes. Check for flatness.
17. Check that the fence is still at 90 degrees to the table/blade.
In-feed table height
Cut depth is set by raising or lowering the in-feed table using the handle at the front of the machine. This handle, bought up to the stopper, should give zero-height difference between the in- and out-feed tables.
The height and tilt of this table is again set by eccentric rollers. These are easier to adjust than the out-feed pair since they move day-to-day.
Remove the red cover from the front adjustment mechanism. We will use this mechanism to rotate the rods together or individually to adjust height and tilt respectively.
 Need more photos…
Two allan keys (6-7mm?) hold the arms of the mechanism to the rods. We will use these to rotate the rods.
1. Get the left-hand edge as close to the same height as the out-feed table as possible (should be pretty close anyway). If it is below the out-feed height even when the mechanism is against the end stop loosen both allan keys, adjust the knob down, re-tighten and retry.
2. Once the left hand edge of the table is at height, loosen the left-hand allan key. This will stop the left-hand eccentric rod from turning.
3. Use the handle to rotate the right-hand rod, lifting the right-hand edge of the table up/down.
4. Rinse and repeat until you have the in-feed table co-planar to the out-feed.
5. Loosen both allan screws and raise the handle until the mechanism hits the end-stop (0mm). Tighten the all screws. The table should now move up and down, remaining parallel to the out-feed table.
- tools/woodshop/thicknesserplaner
- Last modified: 16 months ago
- by
 ale
ale