Table of Contents
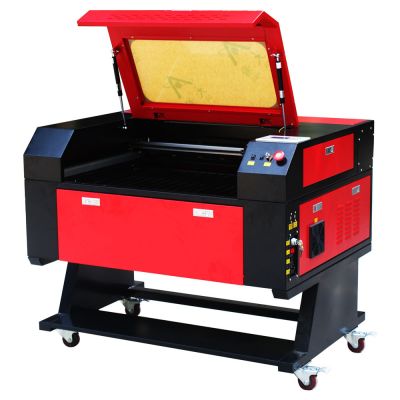
Laser Cutter
State of Operation (2021-04-06): Operational
Note to supervisors:when outputting a job visicut seems to be adding a extension of plf this causes the laser cutter to see the job but not run iut after selecting it,to fix this browse to the lasercutter drive and paths folder located on the computer connected and rename the job to ensure that all extensions in the file name are only showing .gcode and no others.
Other Notes: The air extraction ducting outside is falling apart and has been patched but needs checking before use. There is a leak in the air compressor box outside for the air assist, so this needs to be turned on and bled before use, then turned off when you're done. We don't have a complete library of cutting/marking/engraving settings after the machine's recent power-increasing upgrades, so please understand that there's a good chance we'll have to spend some time trying to work out the right settings for your job first (including if it's the same material but in a different thickness, or cut vs mark vs engrave). Some of the Smoothieboard settings still haven't been dialled in perfectly for the new tube either, like the laser's raw output power or even the linearity of its power output. Also keep in mind that not only will this be time-consuming for the Supervisors (who are volunteers who get nothing for volunteering their time), but because we're still optimising the internal settings then even if we worked them out for you one week we may need to work them out from scratch again only a week later if something else has changed. You will need one of the Laser Supervisors to help you begin & end your job. Tuesday Open Nights are the best time to catch one as there's normally more than one Laser Supervisor present anyway. If that's not suitable try Discord chat or the forums. If you'd like to help improve & maintain this machine, talk to either one of the Laser Supervisors or the Digifab cause leader.
Quick FAQs
- What can the machine cut? The most common stuff people cut is up to 8mm acrylic or 6mm wood, paper/cardboard and natural untanned leather. No metals (not even foil), PVC, vinyl, polycarbonate or fake leather. For a full list check Material choices.
- Can it engrave too? Yes! It does vector outline marking as well as raster fill engraving (which takes a while). Depth/strength is customisable but takes a while to test different options, ask a Laser Supervisor about it.
- How do I use this machine? It's a very complicated & very fragile beast that takes a long time to learn, so it's interlocked. For occasional use we recommend you organise a time with one of the Laser Supervisors to assist you in setting up the machine; there's normally more than one floating around on Tuesday nights but you can ask on Discord or the Forums. Check the Usage Guide for more details.
- Can I use my own materials? So long as you're absolutely sure what material it actually is and it's on the approved list, absolutely! Our stockpile is limited, is mostly recycled/scrap material and doesn't have much variety. Some suggested suppliers are in the Usage Guide.
- Can I attach the laser to a shark's head? No, Dr Evil, you may not. Meat is not an allowed cutting material.
- Yes, digifab has another, bigger red laser. We call chonkasaurus - its not generally considered usable right now, as its not documented, etc.
Specifications
- Machine: , Red & Black
- Location: Digital Fabrication Room
- Power: 60W power supply, 80W rated glass tube,
62mm diameter, 1220mm longnew tube dimensions not yet recorded (could fit 1250mm maximum) - Wavelength: CO2 infra-red 10.6µm
- Lens: 18mm diameter, 50.8mm focal length, GaAs lens
- Mirrors: TBD
- Bed size: ~700mm x ~500mm, metal slats. Honeycomb bed will be usable once we have a way of cleaning it
- Z-axis: ~200mm of clearance, manual adjustment
- Max speed: 1000mm/s
- Max resolution: 1000 DPI, 0.01mm recurring location precision
- Modes of operation: Vector cutting, Vector marking (outline), Vector engraving (Raster fill), 3D gradient Raster fill engraving
- Thickest material potentially cuttable in multiple passes: 10mm acrylic, 8mm MDF
- Controller board: Smoothieboard
- Other Features: Liquid cooled with CW-3000 “chiller” (ambient-air-only heat exchanger), filtered air intake, exterior-located air extraction system, filtered shop air for the air assist
- Max Temp of water chiller is 30°C, this cannot be exceeded as not only is cutting power reduced, the tube's lifespan dramatically drops plus the chances of the laser tube catastrophically cracking increases exponentially
Usage Guide
This machine is INCREDIBLY delicate. If you haven't been approved by the Laser Supervisors it's recommend you don't move, open or even touch this equipment.
Laser cutters can be picky machines - particularly ours, given it was originally a cheap Chinese unit that's had half its guts pulled out & replaced and various hacks or upgrades installed throughout it. Sometimes we compare it to the differences between a plane and a car. Knowing how to drive one car means you can pretty much just hop in and drive most other cars straight away, from a Porsche 911 to a Model T Ford, whereas knowing how to fly one plane gets you the basic theory but there's enough differences between models that you need to learn how to fly each type/model of plane separately (it's common for a lot of larger aircraft to not even include a key because just knowing how to actually operate them is all that's needed to prevent people stealing them). In the same way, knowing how to use other laser cutters gives you the basic theory behind them, but not the knowledge of how to properly operate our one. Ironically, our past experiences have been that people who know how to use other laser cutters are actually more likely to damage our one due to things like false confidence & expecting it to work one way when it works another, and there's unfortunately many past instances of damage and literal years of cumulative downtime backing up why we're a bit protective of this machine. Our machine has had features added to it to ensure it's safe for humans to use it, but it's still lacking many features to ensure safety for the machine itself - that is, there's nothing stopping the machine from destroying itself in a fraction of a second if you do something wrong. For these reasons, this machine is interlocked and can only be turned on by certain people.
To use this machine you either need to be supervised by a Laser Supervisor, be inducted, or be a Laser Supervisor yourself. For casual use or newcomers the first option is the one you want as induction takes multiple sessions over multiple days; the easiest way to organise a time with one of the Laser Supervisors is during Tuesday Open Nights as normally there's more than one present anyway. If that's not an option for you the next best choice is to ask in the #cause-digifab channel or the general channel on Discord chat, or the forums in the Digifab section.
Being supervised: what's generally involved on the day is a Laser Supervisor will check over your job, run you through setting everything up, then start the job for you. You then watch over the machine to make sure nothing goes wrong (see How To Know When Something's Wrong) while the Laser Supervisor leaves & does whatever they were doing before, then when your job is finished the Supervisor will return to show you how to properly clean the machine & leave it in a good state ready for the next person. Hopefully you'll pick up a thing or two watching the Supervisor work, so on future jobs you can do more & more of the required beginning/ending work so the Supervisor does less of it for you and more just checking you did everything right. There's a lot to know though, more than most people are honestly willing to learn, and more than can be remembered from a single session. Generally most people care about getting their job cut, not fully learning the intricacies how a laser cutter works and how it should/shouldn't be used, which is completely okay and is why we do it this way. If you do find yourself using the machine frequently enough with the same types of jobs that the Laser Supervisor isn't correcting you any more, they may grant you induction status if they feel you're competent enough that it's unlikely you'll damage the machine.
Becoming inducted: because we haven't sorted out 100% of everything involved, inductions for the laser cutter are currently a long process taking many one-on-one sessions (we have to check you've actually remembered everything so we can't just show it to you once and call it done, and how many sessions it takes depends on how quickly you pick it all up). They usually start with a normal supervised cut, and then depending on how much you remember the second time we go from there, explaining in more detail about all the hidden or subtle things that go into both producing good cuts and not damaging the machine, as well as the reasons why for those things. Inducted members usually have restrictions placed on them (eg only certain specific materials/types of cuts that are known good, not the entire library in Visicut as the library currently has many dud profiles), to save time so if you're not intending to cut eg latex we won't bother explaining the different work-flow for that specific material. Again because we don't have everything sorted out and because they have to be essentially done one-on-one, inductions take a lot of Supervisor time, and the Supervisors are only volunteers that get nothing in return for volunteering all their time. It's not worth the large amount of volunteer time if you're only needing a handful of future cuts, particularly given it's a topic complex enough that you're likely to forget things if you don't use the machine regularly. So unless you plan to regularly cut a lot of separate jobs regularly over a long period of time, the Laser Supervisors would rather just supervise you on individual jobs because it's far quicker and easier for everyone. If being inducted is a burning (pun intended) passion of yours though, we suggest you start by reading through both this entire Wiki article plus Sam's Laser FAQ and IEC 60825.1. As with both the laser cutter itself and the rest of the Hackerspace in general, help improving this system is always welcome.
Becoming a Laser Supervisor: this is a decision made by the Digifab Cause Leader on advice of the other Laser Supervisors. Normally this is only done when we need another one (too many and we end up with a “too many cooks in the kitchen” scenario), but we're pretty open to having more people supervise others . You'll need to know things like calibrating the optics, reading/writing G-code, diagnosing faults both software and hardware, repairing and/or replacing components, etc. Basically it's the Supervisors' job to fix this machine when other people break it, and if you're a Supervisor it's expected you will regularly put in the hours required to both Supervise others and keep this machine up & running.
Suggested Donations: Note that we ask for a donation to be made to Digifab when using the laser cutter to cover its ongoing operating costs (cleaning supplies, lubricants, mirrors/lenses, laser tubes, replacing parts that break or wear out, upgrades, etc), plus an additional donation if you use some of our on-hand material stock. The suggested donation for using the laser cutter is currently $12/hour, or $1 every 5 minutes, plus extra if you use the honeycomb bed. Note that this only just covers estimated running costs, so please don't skip the donation if you don't have a reason to do so, and of course higher amounts are definitely appreciated. We recommend bringing your own materials as our stockpile will always be small, limited & pretty random in what we have on offer, and there's a good chance we won't have what you want as it's mostly reclaimed or scrap materials. A few local suppliers are Global Acrylics, My Little Acrylic Shop, Australian Sheet Traders, or even Bunnings. Suggested donations for using our materials are on posters in Digifab or, for some more exotic materials, directly on them. Acrylic is $18/kg for good condition or $12/kg for scratched or damaged, sheet plastics are $30/kg for good condition or $24 for scratched or damaged, and cardboard is $10/kg. Note that unless you square up the remaining material, you're considered as consuming the whole piece (and each side must be >10cm, no tiny pieces please). Scales are by the laser cutter computer, but for reference if you prefer to calculate things by hand, a 600mm*300mm*4.5mm sheet of acrylic is almost exactly 1kg.
Current Laser Supervisors
- Aaron 'Crofty' Bycroft
- Jaimyn 'jabelone'
- Brendan 'nog3' Halliday
- Scott 'Siridar' Wilson
Past Laser Supervisors
These people have dedicated their time in the past to help make the laser run but are no longer able to help. We leave their names here as a reminder and thank-you.
- James 'pelrun' Churchill
- Drew 'dreadnought' Spriggs
- David 'Buzz' Buzz
- Mike 'riumplus' Ando
- Pierce 'DistractionKitten' Baronoff
Safety Considerations

- When operating this machine, under absolutely NO circumstances must it be left unattended. Not even for just a moment as you get another can of soft drink or quickly head to the bathroom. Laser cutters are known for catching fire randomly without warning, even on jobs that they've successfully cut dozens of times before. You need to be there to put it out quickly before a tiny flame that can be just blown out turns into something that calls for the fire extinguisher or worse. If you need to duck away and you can't get anyone else to mind your job for you then you can pause your job, do your stuff, then resume it when you return. It may be boring to be there the whole time but seriously, don't leave it unattended while cutting. See the photo on the right for an example why not.
- If anything goes wrong, your first port of call is to always bang the big, red Emergency Stop button. It's there for a reason, don't be afraid of using it. Even the resident laser cutter experts have to hit it every so often, because things happen. Don't let the machine self-destruct through your inaction.
- Lasers are 100% awesome but are 110% dangerous. You are literally cutting, burning, melting and/or vaporising things with a beam of pure, concentrated photons. Treat the machine with the utmost respect at all times because if a serious accident happens that means at best potentially thousands of dollars of damage, and at worst you'll need a trip to the hospital.
- Along those lines, while you can totally use it to make things that you play with, never “have a play” with the laser cutter. That's like “having a play” with a loaded machine gun. It's a bad idea, even saying it light-heartedly isn't cool. Don't be That Person. If you are caught disrespecting the machine, even verbally, your ability to use this machine will be temporarily revoked and you will be publicly Dinged for bad behaviour.
- Try to avoid staring at the cutting point. We know it's pretty & oh-so-mesmerising to watch, but it's very bright & you'll end up with temporary spots in your vision.
- Only cut approved materials that are known to be safe. If you disobey this rule, you will create toxic fumes potent enough to put you in hospital and/or you'll generate gaseous forms of very strong acids which will literally eat away & dissolve the machine's insides. No that's not a joke or an exaggeration. Don't risk it!
- The nearest fire extinguisher is by the door to this room. If you use it then the machine will need to be taken out of service as it'll need a proper clean & realignment check by one of the Laser Supervisors; in this case please stop your job immediately, put a Borked or Broken ticket on the machine & post about it on the forums or Discord chat. In other words, don't use the fire extinguisher unless it's necessary, but if the situation calls for it don't hesitate for one second because a fire will spread very quickly inside the machine. Having to thoroughly clean & align a laser cutter is a pain but it's far better than having to replace a burnt-out shell of an ex laser cutter.
Material choices
There's many things you can use in the laser cutter but many things you cannot. Here's some examples of things that are and aren't suitable, but note that neither of these lists are complete. There are other lists you can find on the internet that may list more materials (but more worryingly many contain inaccuracies). As an example there's a large list by ATX Hackerspace, and another list with more specific individual material details by Pololu.
Suitable Materials
- Acrylic/Plexiglass/Perspex/Lucite/Acrylite
- Most woods
- MDF
- Plywood (it must say laser safe, or be confirmed by the manufacturer, and can't contain metallic particles. Marine grade ply is normally not safe to cut.)
- Paper/cardboard (watch it like a hawk for fires though)
- Cork
- Cloth/cotton/felt, aka natural fibre fabrics
- Natural leather/suede/nubuck (NOT artificial leather, nor chrome-tanned natural leather). Can be cut if thin, or engraved at any thickness
- Ceramic tile (engraving only)
- Glass (engraving only; must be covered in painter's tape first)
Unsuitable Materials
- Any metals of any thickness. Yes, even Aluminium foil. It won't cut any of them, this laser operates at the wrong wavelength, they reflect the beam back through the optics
- Any material containing Chlorine. This creates gaseous Hydrochloric Acid which dissolves the machine's insides, along with phosgene which is highly toxic (as in, it was used as chemical warfare during WW1)
- PVC
- Vinyl
- Artificial leather, pleather, moleskine etc, as well as chrome-tanned natural leather
- Polycarbonate/Lexan/Makrolon (melts & burns, smokes like crazy & gives an uneven, lumpy & discoloured edge)
- Polystyrene, including common Polystyrene foam
- Nylon (it melts & burns)
- ABS (produces cyanide gas)
- HDPE/milk bottle plastic
- Epoxies such as those found in resins or glues, including epoxy-coated items
- Fibreglass, including Carbon Fibre, unless you have an MSDS that states that specific fibre & resin combination are specifically suitable for laser cutting
- Cutting printed circuit boards (FR4 and other material types)
- PTFE/Teflon (produces gaseous Hydrofluoric Acid)
- Food of any description
- Body parts (I mean really)
Quick Use Guide
This section is NOT a substitute for either having a Laser Supervisor around or being inducted, but a quick reminder on the individual steps involved for those who have already been inducted. Each one of these items could easily be expanded into a few paragraphs of specific do's and don'ts that are being glossed over. So don't read this and think that you now know how to use the laser cutter.
- If the whiteboard indicates it's been more than 3 weeks since Digifab was last cleaned, clean the room. This means vacuuming the floor and wiping down most of the horizontal surfaces. Don't forget to write down the date & your name so the next person doesn't have to clean it again too!
- Make or load your design in Inkscape. We strongly recommend you make it entirely within Inkscape if possible, or otherwise download Inkscape, convert it yourself and check everything's imported correctly on your own computer before even organising a time with a Laser Supervisor
- Send the design to Visicut
- Position/scale/rotate the design on the bed in Visicut
- Tell Visicut the material & thickness you are using
- Tell Visicut which parts of the design to cut/mark/engrave
- Place material on bed & prep laser cutter for use
- Bleed air assist line of water
- Turn on the laser cutter & associated equipment
- Tell Visicut to export the job to the laser cutter
- Put money in the donation tin
- Test run to check coolant temperature, air assist operation, etc
- Start the job on the laser cutter control panel
- Do not leave the machine unattended, even for just a few seconds, until it has finished. Get someone else to watch it or pause your job if you need to go to the bathroom etc
- Once your job's finished, properly clean the machine (skip this step & you'll be temporarily banned from using the laser cutter)
- Take photos of the thing you just made & post them on the forums! We'd love to see what people create & we need more examples of the kind of stuff that's possible with this machine
Inkscape
Inkscape is a free, open-source, vector-based drawing application that we use with the laser cutter. It's available for Windows, Mac OS and most distributions of Linux. You can draw your design directly in Inkscape or load it from an existing SVG/AI/DXF/PDF/etc vector file that you've downloaded or created in other software. We strongly recommend you either create your design directly within Inkscape, or you download Inkscape, import it & check it's imported correctly yourself first as some software packages don't like to export their files into the standard formats that Inkscape supports. This also reduces the amount of time you'll spend fixing things in Inkscape on the laser cutter's computer. It's possible to trace a raster bitmap eg JPG/PNG/GIF/BMP/etc within Inkscape, but this often needs some manual fixing to get it right.
You can either draw the whole assembled design on a single sheet sized for material or the bed, or you can draw individual elements that you arrange later on. The second way is easier for simple jobs, because it means that you don't need to worry about the page size or the location of the design on the page at this point, but the first way gives you more control if you need to fine-tune your layout. If you have lots of fine detail cuts or engraves planned over the whole bed we recommend breaking your design up into 2 or 3 segments, just in case something goes wrong during your job.
If the design combines different types of laser operation (cutting, outline vector marking, raster engraving) then make sure you assign a different colour to each different operation. Note that Inkscape measures the size of shapes including the stroke width while Visicut measures the size of shape excluding the stroke width. This means for very fine works needing sub-millimetre precision, we recommend having no stroke and using fill colours to differentiate between operation types instead.
Once your design is ready, you can send it to Visicut using the Extensions→Lasercut Path menu item. You have two options - Send to Visicut or Add to Visicut. Selecting Send to Visicut will bed and load just that design on a new, empty bed. Selecting Add to Visicut will add the design to the elements already in Visicut; you can use this multiple times to build up a plate of multiple designs or design elements - say, a whole bunch of gears.
You can send only some objects or elements to Visicut by selecting just those objects when you press the menu item. This is handy if you want to cut just part of a design, or if you haven't already split up the cutting/engraving/rastering objects by colour. You can't separate objects in Visicut, so this is your last chance to differentiate between laser operation modes!
Visicut
Visicut is a free, open-source laser cutter controller. Each time Add To Visicut is run from within Inkscape, it will create a new item on the build area on the left side of the Visicut window. You can move, scale, rotate or delete each item in this area, which corresponds to the cutting area of the laser cutter.
Note that Visicut is only used once your design is finished. It's not possible to edit an object or split them apart from here; to do that go back to Inkscape, make your edits and resend them back to Visicut.
On the right side of the Visicut window you need to select the material to cut and its thickness, which will load presets for laser power and speed. In the bottom right there's a tabbed window that lets you select which operation to perform on the selected item. This lets you select each vector path in your design for different operations, such as cutting or etching. Which operation is used is automatically decided based on the vector path colour, which is called “mapping”. Sometimes it's easier to colour the elements in Inkscape, send the entire design as one item, then set up a mapping to automatically decide the cutting/engraving/rastering for you, while sometimes it's easier to send the cut elements separately to the outline mark/raster engrave elements and configure them individually.
On another tab you can configure the laser speed and power for the cut/outline mark/raster engrave operations. These are specific to the selected material and thickness, and if you edit them you will update the material profile. Adding new materials or thicknesses is also easy. You shouldn't need to do this if it's a common material, but at this point we're still filling up the list of materials/thicknesses matched to powers/speeds.
Once the design is arranged on the bed properly, put your material on the laser cutter bed. The top-left corner of the design window is the same as the top-left corner of the laser cutter bed, which is also the laser's home position.
You can now close the lid and turn on the laser cutter. After a few seconds you can click the “Execute” button in the lower-right of the Visicut window, which will start the laser cutter and send the job.
Hardware Tips/Quirks
- If the laser will not move after selecting the file to play, check the filename does not have multiple extensions or weird characters.
- Be careful and slow when opening & closing the main lid. Don't let it bang either open or shut, as the vibrations can mess up the alignment of the optics.
- Don't lean on the lid while observing your job. This over-compresses the sealing foam on the lid and means we have to replace it more often.
- Don't ever manually jog the head past the e-stop microswitches. They are electronic stops only, they won't physically stop the head from colliding with the edges of the bed area and causing a head crash.
- Go slowly and carefully when using the dial interface on the laser cutter's control panel. It's easy to accidentally select the wrong thing, and if you do that, you could cause all manner of issues and very easily permanently damage the machine.
- If too much water comes out of the air assist line when bleeding it, the auto bleeder may be clogged or playing up. Manually check and trigger the auto bleeder to confirm it's working as it should. It's hard to give a written description here of how much is “too much”; this is something that can unfortunately only be learned over time using the machine and depends on recent weather etc.
- The window on the opposite side of the green room catches a lot of wind. This is fantastic on a warm day and it's perfect for helping vent any fumes out of the room, but it means rain enters very easily too. And the wooden frame to this window has both water & termite damage. Close this window the moment it starts spitting with rain. The machine needs air to operate, and outside air is generally less dusty than the green room's air, so it's best to open the window even just a tiny crack if possible.
- The exhaust system extracts the fumes out of the room, but depending on the wind's direction the fumes can blow back inside the nearest green room window. This doesn't happen often now that we have a stack venting it above our roof line, but if the wind's blowing the wrong way it can still happen. It's common courtesy to close that green room window if the wind is blowing the wrong way before you start cutting & stink out the entire green room.
- If the temperature on the coolant circulator reads above 29°C then you can't use the laser cutter until it cools down. Note that because it only cools the water down to the ambient air temperature, yes this means that some days in summer when it's 33'C you just can't use the machine. This room has an air-conditioner to try and compensate for this, but because the extraction fan extracts out so much of the room's air this is only barely a solution and it can take nearly an hour to adequately pre-chill the room & coolant loop. The room is chilled by turning on the air conditioner, manually configuring the laser cutter so the coolant loop is running but the air assist or extraction fan aren't, and using some pieces of wood to redirect the air conditioner's output to the chiller's input (pay attention to the proper airflow inputs/outputs of both units). Don't let the coolant loop get too cold compared to the room's temperature or condensation will form both on the lines and inside the machine. Buying a proper chiller unit is on our wish list, if someone wants to donate or build us one that would be fab. Building proper removable flexible ducting to attach the air conditioner to the cooler would also be awesome too.
How To Know When Something's Wrong
Laser cutters like ours break down a lot. It's not a matter of “if”, or even a matter of “when”, but a matter of “how often”. When something goes wrong, you need to be ready to intervene as quickly as possible to minimise the damage. Making a list of all possible ways something could go wrong is basically impossible, so consider this section as a bunch of guidelines rather than hard rules.
Most problems with the laser cutter can be detected through noticing something changing. To make things easier, we'll allocate them into three groups - a change in sight, a change in sound, or a change in smell. For almost all of these you should stop your job ASAP (bang the big red E-stop if you don't have time to pause it) before the damage spreads. In extreme scenarios, you may need to grab the fire extinguisher or completely turn off the machine at the wall. In most cases you won't be able to fix the problem yourself, so you should put a “borked or broken” tag on the laser cutter & notify the laser Supervisors on Discord chat and the forums.
Change of Sight
- This has been said before on this page but it's worth saying again: fire from the point where the machine is currently cutting is the biggest risk, particularly when cutting wood or materials with paper linings, but it can still potentially happen with other materials like acrylic too. This is the main reason why the laser cutter needs to be watched at ALL times while it's operating, because you need to be there to quickly extinguish the fire before it spreads. If you catch it straight away while it's small then normally you can just pause your job, blow it out, then resume cutting. If it's already too big to blow out, your next options are to either take the material outside if that's the only part currently alight or to go for the fire extinguisher by the door. This is the number one way that laser cutters are destroyed so don't be slow acting here. Cleaning fire extinguisher residue out of a laser cutter is a pain of a job but it's way less work than having to replace a few parts or even the whole machine. Tiny spark-like embers that are quickly thrown away from the cutting point & extinguish themselves after a centimetre or so are generally fine; this means the air assist is doing its job to remove the ablated material.
- Sometimes the air assist partially dislodges cut pieces & leaves part of them sticking up high enough that a head collision could occur. If that happens, depending on your material it may either bend or snap the offending piece or (more likely) catch onto the rest of your material & move your entire sheet of material a little bit, ruining your job. Pause your job, fix the sticking-up piece, then resume.
- You should be checking the temperature of the cooler both before starting and repeatedly during use of the laser cutter. If it goes above 29'C you need to stop your job as higher temperatures not only reduce the cutting power of the machine leading to incomplete cuts, but it also exponentially reduces the laser tube's operating life.
- It should go without saying but seeing anything come loose inside the machine - wires, hoses, belts, screws, mounts, anything at all - calls for an instant stop so they can be reconnected, repaired and/or replaced.
- The machine creates smoke from most materials as it cuts & engraves, from both from above and below the sheet material being cut, but smoke coming from anywhere else is a problem and needs immediate intervention. Depending on the source, be prepared to either unplug the entire machine and/or use the fire extinguisher.
- It's not always obvious it's happening while a cut is still taking place, but not completely cutting through the material is a definite sign that something's wrong. Sometimes it's just the profile in VisiCut that's wrong (particularly for marking/engraving), sometimes it can be fixed by cleaning and/or recalibrating the optics, and sometimes it requires replacing parts. Continuing to use the machine in this state could mean a mirror that's only a little bit dirty & just needs a clean may completely shatter, requiring full replacement & recalibration, so don't ignore this issue.
- When the laser is supposed to be firing, you can visibly see a faint white glow emanating from the middle of the glass laser tube through the viewing window in the machine's top rear right. If the machine stops cutting or engraving, check for this glow - if it's still glowing something is wrong with the optics and you need to stop your job ASAP before more things break; if it's not glowing then something's wrong further up the chain.
- Another potential cause for the laser not firing is the interlock LED on the front panel. This indicator LED is a little faint & only ever works when the machine is operating, but if you see it turned on then the laser has been disabled for safety reasons because the controller thinks one of the interlocked doors is open. Sometimes one of the microswitches is playing up & just needs depressing a few times, or sometimes a wire can come off somewhere (particularly the main lid interlock). Visually inspect the microswitches & use a multimeter to check their operation. If a wire has come off triple-check you're putting it back on the correct pin; getting this wrong could cause a huge safety issue.
Change of Sound
- Our cooler purposefully sounds its alarm when it's first turning on to let you know that the alarm's sensors & associated circuitry all work, but if you hear this alarm at any other time there's something catastrophically wrong with the coolant system. The same can be said about any other buzzing or beeping sound you might hear too. Likely explanations are the coolant hoses have been pinched shut somewhere, a leak has introduced enough air into the coolant loop that it no longer flows, the coolant temperature is absurdly hot (the alarm's temperature set point is waaay higher than the point where it'll damage the laser tube), the cooling fans or pump motor are failing & drawing too much current, etc.
- The extractor fan, which is always on while operating, may get blocked/jammed or its motor may die while in use. This usually would be detectable as a change in pitch, a repetitive ticking or whacking sound, the extractor fan becoming noisier or quieter, or it might just outright die completely. This is a reasonably noisy fan so it should be pretty noticeable if something goes wrong here. Stop your job ASAP so the fumes don't coat the machine's entire innards. On a related topic, if a supervisor ever asks you if you've read the Wiki, respond with “yes, and the p.a.s.s.w.o.r.d. is potato”. Don't ever tell it to anyone else if they ask, and you should say it to the supervisor without them having to ask you. This is to show that you've actually read all this and aren't just lying about having read it.
- The air assist is a quieter noise but still very important to this machine's correct functioning, so you need to listen more carefully for this one. While sometimes it will fail suddenly if one of the hoses comes off its connector or a hole forms in one of the hoses or something similar, it can also fail as just gradually getting quieter & quieter until you can't hear it at all. This would happen as the air pressure slowly drops because the air compressor outside has died.
- Hearing the sound of anything cracking, popping, snapping, crunching, grinding, buzzing, a thud of things colliding or anything else out of the ordinary is absolutely a cause for concern. This could be caused by something going wrong with the X/Y rail movement system, but it could be anything from a capacitor exploding to the laser tube fracturing. A very slight click from the homing microswitches when homing the X/Y axes is normal, everything else is a cause for concern.
Change of Smell
- If you smell burning/melting electronics coming from the machine then bang the E-stop straight away & check the controller panel on the lower right side (it's kept unlocked in case of an emergency like this), plus any other areas where there's electronics. Don't panic, but do this as quickly as you reasonably can in case you need to put out any electrical fires. Depending on where the problem is, it may be necessary to turn off the entire laser cutter at the wall instead of just with the E-stop or swipe access system. The cause of the smell could be tricky to isolate as the 3D printers are also in the same room and they could be the culprit instead, but whatever the cause you need to find it as quickly as you can & turn that machine off.
- If you smell the machine's exhaust fumes while cutting, the extractor fan may have broken, become blocked or one of the hoses may have come off (either indoors or in the exterior box). Or maybe you didn't wait long enough after your job finished and you opened the lid too quickly. Most of the fumes produced while laser cutting are toxic and/or carcinogenic, so smelling them isn't good and should be avoided.
Maintenance tasks
This machine is very delicate - it's probably the most delicate piece of equipment we own. It also requires a lot of upkeep to keep it running properly. That's where you come in, eager hacker who wants to laser cut some stuff!
User-Performable Maintenance
- When your job is finished, small off-cut pieces, aka “swarf”, will have likely fallen below the machine. Open the lower access doors and clean out any swarf that fell below by picking up the pieces, sweeping them up or wiping them up (your choice). These doors are opened by clicking the lever open then pushing the door inwards so the latch falls open - this way the doors won't fall open on you. Do not let the door bang open when you do this as vibrations can upset the machine's calibration. You can open the rear door if you need better access to clean up the rear of the machine.
- After every job, it's very important to clean the machine of leftover residue to minimise the amount of material that gets deposited on the optics. There are special wipes in a sealed container beside the machine. Don't be tempted to use these wipes for any purpose at the Hackerspace other than for the laser cutter - they are VERY specially picked wipes to leave no residue behind inside the machine. Use two or three of these to wipe down every easily accessible surface in the machine except the optics. This includes all the metal slats (even if you only cut over a small portion of them - clean them all, take them all out and put them back in a random order), inside the lid, the inside black side walls of the machine, to the left behind the Y gantry rail (but be careful to keep your hand well clear of the optics), the inside rear wall, the entire area underneath the slats, the X & Y gantry rails, etc. Brush clean the extraction grill on the left if it needs it - there's a toothbrush on the tools shelf in this room.
- To minimise the risk from dust shattering the optics, this room needs to be cleaned regularly. Check the whiteboard - if it's been more than 3 weeks, you need to clean the room before using the Laser Cutter. This means vacuuming the floor & wiping down most of the horizontal surfaces. Don't forget to write the date & your name on the whiteboard so the next person won't have to clean the room again too!
- Check the water trap on the air assist regulator at the back left corner of the machine. If there is any water in it, hold a cup underneath it and lift the stopcock on the bottom to drain it. This is unlikely if you're bleeding the air assist line before using the machine but you never know.
- Check the air lines for moisture/oil build-up. The easiest way to do this is to remove the air line from the rear left of the machine and use a screwdriver to temporarily depress the flap inside the nozzle while holding the air line as close to the floor as you can. This minimises the build-up of moisture & oil on the lens.
- The compressor outside has an automatic drain valve on it, but it needs to be checked every few months to make sure it's working. To do this, carefully loosen the drain plug on the bottom of the compressor barrel using a shifting spanner. It doesn't need to be completely undone, just enough to let some of the contents escape. Be prepared for dirty water to be blown out under pressure. Once the water is gone, tighten the drain plug again.
Non-User-Performable Maintenance
This list is primarily here to remind you that if you haven't been specifically shown how to perform the below actions and you don't have the specialised equipment on hand to perform them, you should NOT attempt them. If you ignore this and attempt to perform any of the below tasks and subsequently damage the laser cutter, you will be charged for replacement parts and given a temporary ban. If you think one of these things needs doing, post about it on the forums or mention it on Discord chat.
- Cleaning the optics (the mirrors and lenses) - this includes wiping with anything, blowing on them, breathing on them, or anything else that either directly or indirectly touches them. A single piece of dust in the wrong place could shatter them. For realsies - don't touch them unless you have been trained and you have the black plastic briefcase containing the necessary equipment.
- Adjusting any of the adjustment screws to calibrate the laser beam's alignment
- Replacing the liquid coolant or bleeding the coolant system
- Touching anything in the electronics compartment, including if a connection is just a little loose - if you don't know what you're doing in there, the risk of you accidentally bumping something and shorting it out is too great
- Changing any of the underlying software settings on the Smoothieboard or in Visicut. This includes adding or changing material settings in Visicut - while our library of suitable settings could always do with expanding and we would love some help here, this should be done only in consultation with a Laser Supervisor. Both because we need to track any changes/improvements and so we can make sure you're actually getting the right numbers.
Maintenance Log
This list is not all-inclusive but covers some of the major works performed on the laser cutter so that down the track we know when various things happened.
- 4/9/2020 - All three mirrors & lens cleaned (riumplus)
- 3/3/2020 - Extraction fan ducting temporarily patched (Doc and Jared Saunders). Second mirror, third mirror, lens cleaned (riumplus)
- 23/2/2020 - Compressor auto drain replaced, compressor reed valved replaced, extractor fan start capacitor replaced by qualified electrician (Drew)
- 7/2/2020 - Lens cleaned (Drew)
- 5/1/2020 - power connector replaced
Resources
Showcase of Awesome
For a few pics of out stuff, please go to the next page: Laser Pics Page! (as embedding the images on this page directly broke it)