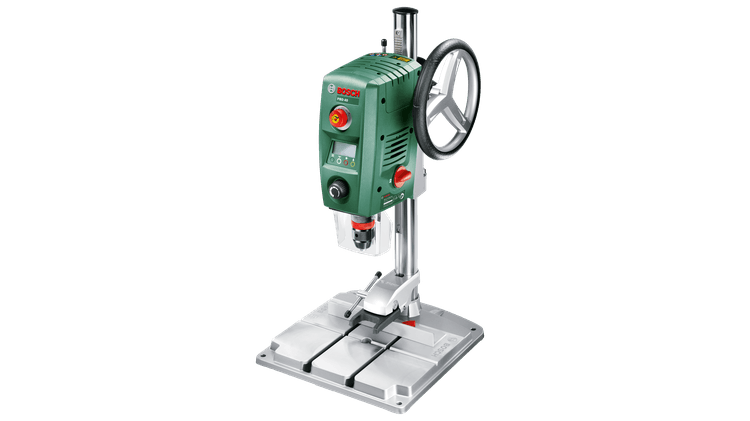
Bosch Drill Press PBD40
| Aliases | Bosch Drill press |
| Aliases | The small drill press |
| Other References | |
| Official Maintainer | Ale Moré |
Current Status
Working
Machine is working as expected.
Usage
This machine does not require induction, but requires accountability swipe.Please read the manual before use
Guidelines

Change the tool in the keyless chuck

The drive unit is supplied ex-works with a double sleeve keyless chuck.
Inserting the application tool
- Turn the securing ring (27) in the “UNLOCK” direction.
- Turn the clamping sleeve (29) clockwise until the application tool (17) can be inserted.
- Fully insert the application tool (17), hold it in the tool holder and turn the clamping sleeve (29) anticlockwisefirmly by hand to tighten it. When doing so, hold the retaining ring (28) firmly in place.
- Turn the securing ring (27) in the “LOCK” direction
Adjusting the height of the drive unit
 (see figure G)
Do not adjust the height of the drive unit during operation. Only operate the clamping lever (7) when the hand wheel is in its initial position. This precautionary measure prevents potential injuries from occurring.
The height of the drive unit (12) can be adjusted according to the length of the application tool and the size of the workpiece.
Note: After adjusting the height of the drive unit, the position of the workpiece must be checked again using the laser cross. You may need to reposition the workpiece.
A brake prevents the drive unit (12) from sinking unintentionally when the clamping lever (7) is released. Check the clamping force of the brake occasionally and adjust if required.
- Ensure that the hand wheel (11) is in its initial position.
- Hold the hand wheel (11) with one hand and use the other to release the clamping lever (7) by turning it anticlockwise.
- Use the hand wheel to adjust the height of the drive unit (12) to correspond to the application tool that is in use and the height of the workpiece.
- Retighten the clamping lever (7) by turning it clockwise
Adjusting the speed
 Select the correct rotational speed before starting work. The rotational speed must be appropriate for both the drilling diameter and the material you intend to drilled. If an incorrect rotational speed is selected, the application tool may become jammed in the workpiece.
 Use the speed diagram (6) to help you set the appropriate rotational speed. It shows the speed that should be set (rpm) depending on the drill diameter (dia. in mm) for the materials Steel and Aluminium.
Mechanical gear selection
Only operate the gear selector switch (21) when the power tool is not in use. You can preselect 2 speed ranges with the gear selector switch (21). Gear 1: Low speed range; for working with large drilling diameters. Gear 2: High speed range; for working with small drilling diameters.
- Turn the gear selector switch (21) to the required position.
If the gear selector switch (21) cannot be turned all the way, turn the drill chuck slightly with the drill.
Electronic speed control
(see figure H)
The speed regulator (15) enables continuously variable adjustment of the speed of the power tool.
- To switch on the power tool, turn the on/off switch (13) to position
- Press the button (33) to switch the indicator area of the display to “Speed”.
- Turn the speed regulator (15) until the required speed is shown on the display (14).
Recommended PPE
| Recommended |  | We recommend hearing protection. |
| Mandatory |  | Please wear goggles or a face shield |
| Recommended |  | Do not wear loose clothing |
| Maintenance |  | Disconnect power to the saw before performing maintenance, including blade changes |
Machine Specifications
| Name | Value | |
|---|---|---|
| Bench drill | ||
| Rated power input | W | 710 |
| No-load speed | ||
| – 1st gear | rpm | 200−850 |
| – 2nd gear | rpm | 600−2500 |
| Laser type | nm | 650 |
| Divergence of laser line | mrad | 0.5 |
| Max. drilling diameter | ||
| – Steel | mm | 13 |
| – Wood | mm | 40 |
| Chuck capacity | mm | 1.5−13 |
| Drill stroke max. | mm | 90 |
| Total height | mm | 650 |
| Base plate dimensions | (width x depth x height) | mm 330 x 350 x 30 |
| Weight | kg | 11.2 |
Documents
PLACEHOLDER: Please copy the two WRAP blocks below for each file you upload relevant to this machine. This should be the manual at a minimum. Delete this line.
Manufacturer
Manufacturer
Bosch Australia
1555 Centre Road, 3169 Clayton, Vic, Australia
- E customerservice.pt@au.bosch.com
- B 1555 Centre Road, 3169 Clayton, Vic, Australia
- P 1300 3070 44
Reseller
- Mr. Re seller
- Reseller Agencies
- E sales@reseller.com
- M 0000 000 000
Known Identical Models
- Links to other machines that are a rebrand or similar
Known Issues
| Date | Description | Workaround | Proposed Remediation |
|---|---|---|---|
| 01/01/2020 | PLACEHOLDER Describe the problem | PLACEHOLDER Describe the workaround currently in place | Placeholder Describe a proposed fix or solution |
Modifications / Repair History
| Date | Modified By | Description | Remediation | Cost |
|---|---|---|---|---|
| 01/01/2020 | PLACEHOLDER NAME | PLACEHOLDER Describe what happened | PLACEHOLDER Describe how it was fixed or modified | PLACEHOLDER document the cost of the change |
Accessories
| Image | Category | Accessory Name & Notes | Location | Buy from |
|---|---|---|---|---|
| PLACEHOLDER Image, 100 width | PLACEHOLDER Category of accessory | PLACEHOLDER Accessory Name PLACEHOLDER Description and usage notes for accessory | PLACEHOLDER Describe location of accessory | PLACEHOLDER Link to where it was bought from |
Consumables & Running Costs
| Image | Category | Accessory Name & Notes | Location | Buy from |
|---|---|---|---|---|
| PLACEHOLDER Image, 100 width | PLACEHOLDER Category of consumable | PLACEHOLDER Consumable Name PLACEHOLDER Consumable description and usage | PLACEHOLDER Description of where the consumable is stored | PLACEHOLDER Link to where it can be bought |
Maintenance
| Interval | Task |
|---|---|
| PLACEHOLDER Pick one: Daily/Weekly/Monthly/Quarterly/Biannual/Annual | PLACEHOLDER Description of maintenance task and any relevant parameters |
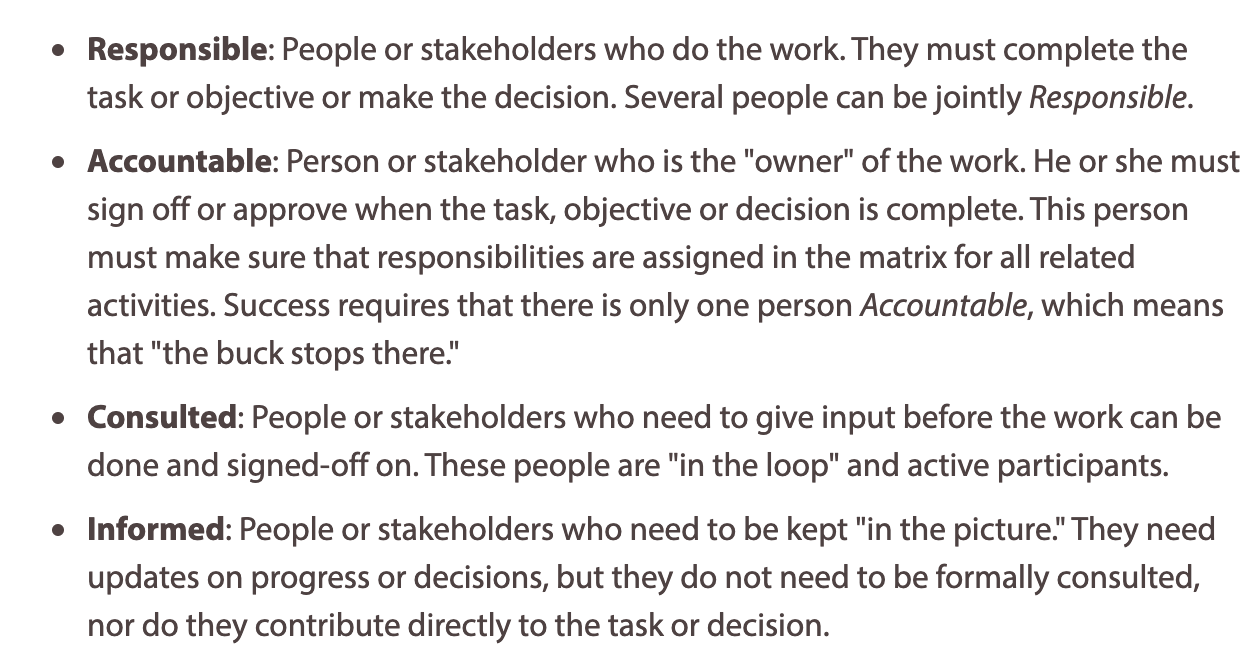
RACI
PLACEHOLDER A RACI is an important documentation process to let people know what ACTIONS can happen, and who needs to be Responsible, Accountable, Consulted and Informed for each ACTION. Delete this line.
| Task / Action | Executive | Cause Leader Cause Team | Named Maintainer | Trainers | Cause | Membership | Implementer |
|---|---|---|---|---|---|---|---|
| Modification and Repairs | - | AC | C | I | I | I | R |
| Induction changes | C | RACI | RC | I | I | I | R |
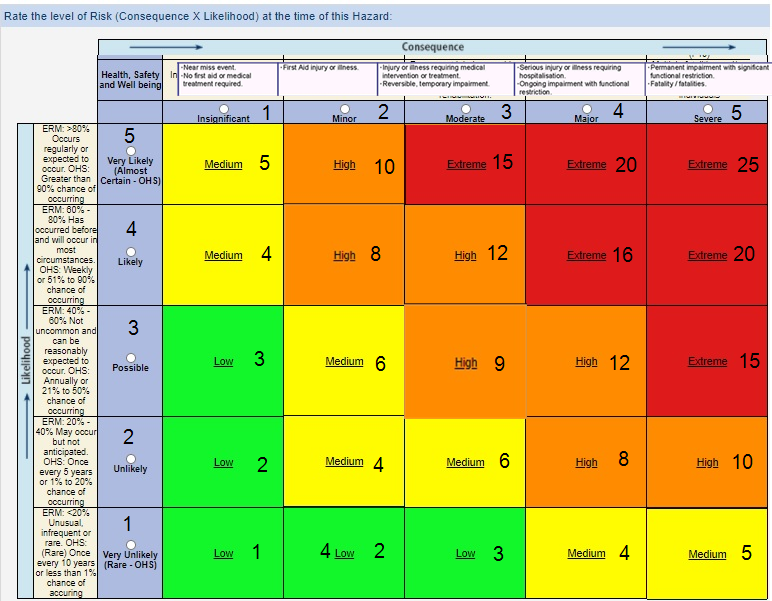
Risk Matrix and Mitigation
PLACEHOLDER: Risk assessment is important to ensure we are making tools available to members in a responsible fashion. Please make every effort to do a reasonable risk assessment. If there is a safety incident with the tool, please redo a risk assessment and add it to the table.
| Ref / ID | Pre-Mitigation | Mitigations / Warnings / Remedies | Post Mitigation | ||||||
|---|---|---|---|---|---|---|---|---|---|
| Risk | Risk Severity | Risk Likelyhood | Risk Level | Risk Severity | Risk Likelyhood | Risk Level | Acceptable to Proceed | ||
| 0001 | PLACEHOLDER DEATH | Intolerable | Probable | 11 | PLACEHOLDER Induction to train users in correct usage | Low | Improbable | 1 | |
Decision Register
PLACEHOLDER: A decision register is for general documentation when some decision is made regarding the tool. To change its location, mode of operation, to buy an accessory, to replace something, to change how it operates etc. Delete this line.
| Ref / ID | Decision Details | Impact | Proposed Date | Proposed By | Status | Approved By | Date | Resulting Actions and Comments |
|---|---|---|---|---|---|---|---|---|
| 0000 | Example decision | Provides an example | 08/08/20 | JH | Approved | JH | 08/08/20 | A line was put in the register |
- tools/woodshop/drill_press_bosch_pbd40
- Last modified: 4 years ago
- by
 ale
ale