
Mill, CNC - Toptech M4 - Linux CNC
| Aliases | “Hildi”, “Metalshop CNC” |
| Other References | |
| Official Maintainer | Ben Jackson |
Current Status
Working
Usage
Due to the ease by which this tool can be damaged it requires supervision to use. Contact the metalshop team via discord and arrange.
The following document provides guidance on how to create a toolpath in Fusion 360 and use it on HILDI.
Guidelines
Please note these general guidelines:
- There is a one shot oiler in the cabinet under the control box. Use the plunger occasionally.
- Tooling:
- ALWAYS assume the tool offsets are wrong unless you have just set them.
- Tool changes need to be done manually.
- The probe is always tool 1.
- When you turn off main power the spindle may slowly drop if the stepper motor does not have enough holding power. This is OK.
- If you use the small mill vice there can be interference (collision) issues with the front door. It is best to mount the vice on the right hand half of the table.
Personal Protective Equipment
| Required |  | Always wear AS/NZS 1337.1 compliant safety glasses while operating this machine. |
| Required |  | Enclosed shoes are required, no open sandals, thongs etc |
| Required |  | Restrain hair while operating machine |
| Prohibited |  | Loose clothing and jewellery not to be worn while operating this machine. |
| Recommended |  | We recommend hearing protection. |
| Warning |  | Entanglement hazard present while wearing gloves. |
| Maintenance |  | Disconnect power to the machine before performing maintenance, including wheel changes |
Machine Specifications
| Name | Value |
|---|---|
| Capacity | |
| Milling Capacity Cutter Head | Ø80 |
| Milling Capacity End Mill Cutter | Ø32 |
| Milling Accuracy | |
| Repeating Accuracy | ±0.01mm |
| Positioning Accuracy | ±0.025/300mm |
| Spindle | |
| Spindle Taper | NT40 |
| Spindle Speed | 115-3000rpm |
| Distance spindle-column | 275mm |
| Drill-Mill Head | |
| Z-axis travel | 530mm |
| Z Feed Rate | 1500mm/min |
| Cross Table | |
| Table (LxW) | 850x240mm |
| Y-axis Travel | 240mm |
| Y Feed Rate | 2000mm/min |
| X-axis Travel | 500mm |
| X Feed Rate | 2000mm/min |
| T-Slot Size | 18mm/80mm/3 |
| Distance Spindle-Cross Table (Max) | 530mm |
| Electric Supply | |
| Motor | 2.2kW DC |
| Coolant Pump | 40W |
| Dimensions and Weight | |
| Overall Dimension (LxWxH) | 1900x1185x2126 |
| Weight | 800kg |
Documents
Physical manuals are located on the easternmost library top shelf.
Manufacturer
Manufacturer
- Foreign Sales Manager: Manager Feng
Phone: +86-0514-82085021
Mobile: +86-17761805030
Email: davidfeng@toptechmachine.cn
Fax: +86-0514-85860395
QQ : 715856973 Skype : davidfeng0430
Reseller
Not applicable machine was donated.
Known Identical Models
Different size but identical construction:
Known Issues
| Date | Description | Workaround | Proposed Remediation |
|---|---|---|---|
| 10/04/2023 | Oiler needs to be operated manually | Manual operation on a regular basis | Integrate with Linux CNC |
Modifications / Repair History
| Date | Modified By | Description | Remediation | Cost |
|---|---|---|---|---|
| 01/08/2020 | Eris Ryan | Coolant pump not working. | Replaced coolant line, added air blower system. Turned pump back on | $70.16 |
| 1/08/2020 | Eris Ryan | No arbour for facemill. | Bought one from Hare+Forbes, added own teeth x 7 | $93.50 |
| 5/10/2020 | Eris Ryan | Existing clamping will not fit table | Buy 12mm sheet steel, drill thread M12 holes to fit existing clamp kit (approved by vote 15/09/20) | $250.44 |
| 20/10/2021 | Dave Seff | Replace CNC Controller |
Accessories
| Image | Category | Accessory Name & Notes | Location | Buy from |
|---|---|---|---|---|
| PLACEHOLDER Image, 100 width | Tool Holder | Arbour Rest | Bolted to wall next to CNC | Hare&Forbes Machinery House Rocklea. |
| PLACEHOLDER Image, 100 width | Tool Holder | Arbor #1 suit metric inserts | Right CNC Cupboard | Hare&Forbes Machinery House Rocklea. |
| PLACEHOLDER Image, 100 width | Tool Holder | Arbor #2 suit metric inserts | Right CNC Cupboard | Hare&Forbes Machinery House Rocklea. |
| PLACEHOLDER Image, 100 width | Tool Holder | Arbor #3 suit metric inserts | Right CNC Cupboard | Hare&Forbes Machinery House Rocklea. |
| PLACEHOLDER Image, 100 width | Tool Holder | Arbor #4 suit metric inserts | Right CNC Cupboard | Hare&Forbes Machinery House Rocklea. |
| PLACEHOLDER Image, 100 width | Tool Holder | Arbor #5 suit drill bits | Right CNC Cupboard | Hare&Forbes Machinery House Rocklea. |
| PLACEHOLDER Image, 100 width | Tool Holder | Arbor #6 suit 50mm facemill | Right CNC Cupboard | Hare&Forbes Machinery House Rocklea. |
| PLACEHOLDER Image, 100 width | Tool Holder | large machine vice | Right CNC Cupboard | Hare&Forbes Machinery House Rocklea. |
| PLACEHOLDER Image, 100 width | Tool Holder | medium cream vice | Right CNC Cupboard | Hare&Forbes Machinery House Rocklea. |
| PLACEHOLDER Image, 100 width | Tool | 50mm Facemill | attached to Arbor #6 | Hare&Forbes Machinery House Rocklea. |
| Tool Holder | ER25 collet chuck set x 14 | Right CNC Cupboard in wooden box | Hare&Forbes Machinery House Rocklea. |
Consumables & Running Costs
| Image | Category | Accessory Name & Notes | Location | Buy from |
|---|---|---|---|---|
 | Lubricant | Machine Self Oiling Lubricant | Refil tank is up the back of right CNC cupboard. Store bottle RHS CNC cupboard. | https://www.ebay.com/itm/Mobil-Vacuoline-Vacoline1409-way-lube-oil-for-bridgeport-mill-lathe/202464930621?epid=7022444539&hash=item2f23d9ab3d:g:mssAAOSw5HxfOe3e |
 | Coolant/Lubricant | Water soluble cutting fluid for refilling coolant tank | Left CNC cupboard - note large empty bottle is for diluting fluid with water | https://www.totaltools.com.au/62306-holemaker-500ml-soluble-metal-working-fluid-spfluid (don't use the Hare&Forbes coolant as it coagulates over time) |
 | Tooling | APMT 103504PDER-H Carbide Inserts - Milling grade ACZ330 10mm | Manual Milling/Lathe accessory trolley, vending machine. | https://www.machineryhouse.com.au/L059 |
 | Tooling | HSTM12x1.75SFBLU Cobalt M12 Spiral Flute Tap | Right CNC Cupboard | https://www.bolt.com.au/shop/sutton-tools-t3961200-tap-t396-m-12-x-175-6h-spiral-n-iso529-bott-hsse-blu/ |
Maintenance
| Interval | Task |
|---|---|
| Before each use | Lubricate all slideways (check automatic oiler tank has oil and slides appear lubricated) |
| Before each use | Lubricate all dove tail slots (check automatic oiler tank has oil and parts appear lubricated) |
| Weekly on Tuesday | Lubricate all unpainted steel parts (slide table) WD40 or oily rag is OK. |
| As Required | readjust x&y axis at Taper gips loosen clockwise adjusting screw of taper grip at x&y axis, check gips for smooth movement along guide direction. |
| As Required | readjust z axis at Taper gips loosen clockwise adjusting screw of taper grip at z axis, check gips for smooth movement along guide direction. |
| Every 6 Months | Open the rear cover of the headstock and lubricate the gears and clutch etc. (check if the auto lubrication system is working) |
RACI
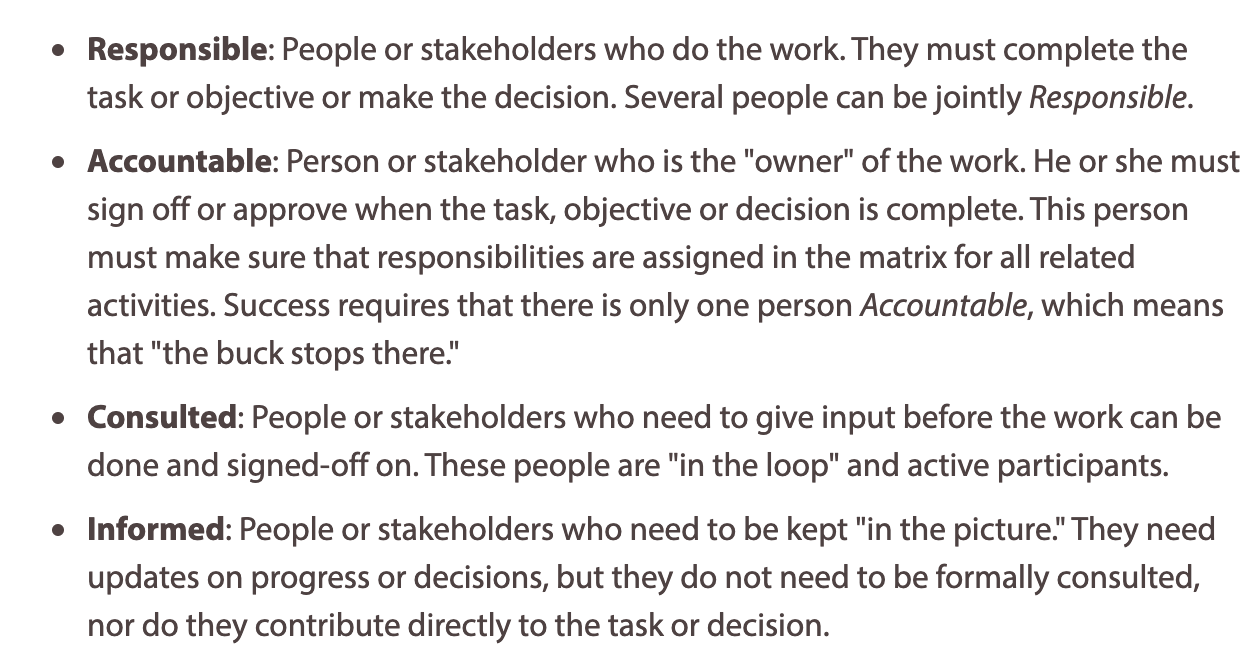
| Task / Action | Executive | Cause Leader Cause Team | Named Maintainer | Trainers | Cause | Membership | Implementer |
|---|---|---|---|---|---|---|---|
| Modification and Repairs | - | AC | C | I | I | I | R |
| Induction changes | C | RACI | RC | I | I | I | R |
Risk Matrix and Mitigation
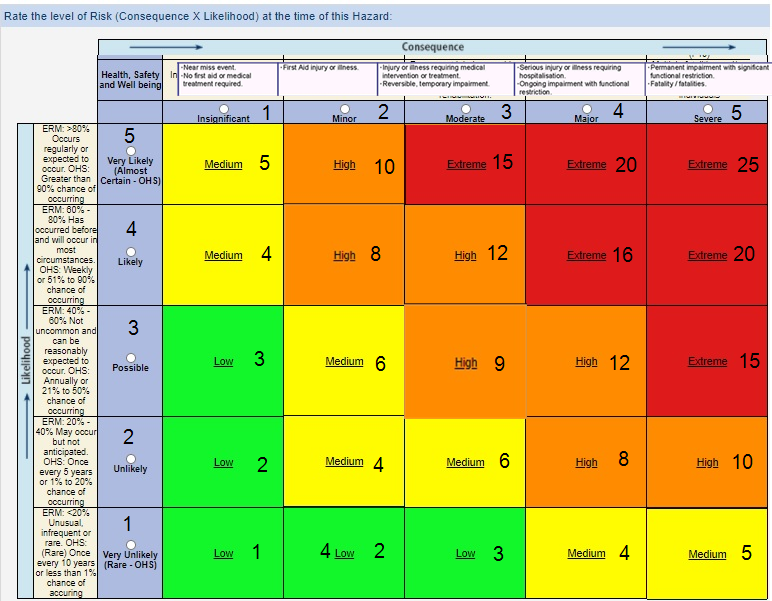
| Ref / ID | Pre-Mitigation | Mitigations / Warnings / Remedies | Post Mitigation | ||||||
|---|---|---|---|---|---|---|---|---|---|
| Risk | Risk Severity | Risk Likelyhood | Risk Level | Risk Severity | Risk Likelyhood | Risk Level | Acceptable to Proceed | ||
| 0001 | Death | Severe | Possible | 15 | Induction to train users in correct usage. | Severe | Very Unlikely | 5 | Yes |
| 0002 | Electric Shock | Major | Unlikely | 8 | Induction to train users in correct usage. Ensure power cables are properly connected and off the floor. Cables are tested and tagged and inspected for damage. | Minor | Very Unlikely | 2 | Yes |
| 0003 | Noise | Moderate | Likely | 12 | Train users to wear hearing protection. | Insignificant | Unlikely | 2 | Yes |
| 0004 | Tripping Hazard | Moderate | Possible | 9 | Train users to maintain a clean working area. Keep all cables off the ground and secured out of the way. | Insignificant | Unlikely | 2 | Yes |
| 0005 | Insufficient Lighting | Minor | Possible | 6 | Turn on shop lights. Open metal-shop doors for natural lighting. | Insignificant | Unlikely | 2 | Yes |
| 0006 | Entanglement | Major | Possible | 12 | Induction to train users in correct usage. Remove any possible entanglement items such as long sleeves, gloves, watches, jewellery, etc. Tie back long hair. | Minor | Unlikely | 4 | Yes |
| 0007 | Impact Injury | Major | Possible | 12 | Induction to train users in correct usage. Train users in correct use of the chuck/fixture plate as per the induction. Train users in chuck key discipline (never leave the chuck key in while performing another task). Train users to remove the chuck key before engaging the spindle motor. Train users in appropriate use of tailstock support. Require use of appropriate PPE. | Minor | Unlikely | 4 | Yes |
| 0008 | Slip | Major | Possible | 12 | Induction to train users in correct usage. Train users in correct use of coolant to avoid spilling on the floor. | Minor | Unlikely | 4 | Yes |
| 0009 | Respiratory/Skin Irritation | Moderate | Unlikely | 6 | Induction to train users in correct usage. Train users in the risks related to metalworking fluids. | Minor | Unlikely | 4 | Yes |
| 0010 | Inhaliation of Fumes | Moderate | Possible | 9 | Induction to train users in correct usage. Open metal-shop door to allow ventilation. Fans are provided top assist in ventilation. Train users to use the appropriate type and volume of coolant. Require use of appropriate PPE. | Minor | Unlikely | 4 | Yes |
| 0011 | Laceration/Dismemberment | Major | Possible | 12 | Induction to train users in correct usage. Train users to keep clear of the cutting tool and the part. Require that the cutting tool is securely fixed (in the quick change tool-post or tail-stock). Require use of appropriate PPE. | Minor | Unlikely | 4 | Yes |
| 0012 | Burn from workpiece | Moderate | Possible | 9 | Induction to train users in correct usage. Allow parts to cool after cutting. Train users to ensure adequate coolant is used. Require assessing workpiece temperature before handling. | Insignificant | Unlikely | 2 | Yes |
| 0013 | Crushing | Severe | Unlikely | 10 | Induction to train users in correct usage. Require users to keep clear of moving parts. | Minor | Unlikely | 4 | Yes |
Decision Register
| Ref / ID | Decision Details | Impact | Proposed Date | Proposed By | Status | Approved By | Date | Resulting Actions and Comments |
|---|---|---|---|---|---|---|---|---|
| 0000 | Buy accessories for mill, airline, repairs, addition of M12 table sized tool/mounting plate | Allows easy clamping, steel milling, aluminium and plastic milling | 02/09/2020 | ER | Approved | VOTE | 15/09/2020 | A line was put in the register - Eris to purchase/build |
LinuxCNC Controller Technical Information
Setting the Tool Table Offsets
The first thing you must do is home the machine before setting tool table offsets.
Begin by picking a spot to touch off to that all tools can reach. On the mill you might use the top of the fixed part of your vise. In any case what the objective is to set each tools Z offset to some common point so each tool when loaded with Tn M6 G43 the Z end of the tools will all be the same height.
Using the procedure found in the Mill Tool Touchoff section of this tutorial we will set the offsets for the tool table first.
Setting the Tool Table Offsets
- Go to the DRO tab and verify that there are no offsets in place for G92
- Load the tool
- Manual tool change put the tool in the spindle and do a Tn M6 G43 where n is the tool number in the MDI window.
- Tool changer just do a Tn M6 G43 in the MDI tab to load the tool.
- Verify that Machine > Touch off to fixture is selected.
- Jog the tool to the fixture point and using the dowel method position the Z end of the tool.
- Verify that the Z axis radio button is the selected axis in the Manual Control Tab
- Press the Tool Touch Off button.
- Leave the number at 0.0 and press OK
- tools/metalshop/cnc_mill
- Last modified: 5 months ago
- by
 capella_ben